Tuesday, December 13, 2011

WHO is making owls?

In first grade, students learn about symmetry (if something is folded in half, it's the same on both sides.) 
We learn how to draw an owl, making sure to have big eyes, a small beak, wings, and even details like feathers.
After we draw, we sculpt!  Students get a ball of clay, make a ball, then flatten it like a pancake. 
Next, they make eyes, a beak, wings, and other details they might see on this mysterious creature!
The coloring is left to their imagination!


Here are some of our 1st grade student's clay owls!

Thursday, October 13, 2011

Mandalas: Concentric Circles

I talk about concentric circles with my 2nd grade students every fall.  We talk about how concentric circles are many circles with the same center, and I show them images of mandalas from all over the world.  I also tell them that they are sacred and tell the story of a special place of the artist. 
Next, they start designing their own mandala, using ice cream lids as the outer circle, and other round containers to make more circles.  Students also pick up quickly that all of the mandalas are cymmetrical (the same on both sides.)  They also use templates and other objects in the Art room to add geometric shapes (the ones with names: circle, square, triangle, etc.)
Here are some amazing artists:


Wednesday, October 12, 2011

Roller Coasters!

Students in kindergarten and 1st grade talked about the many different kinds of lines they saw: straight, curvy, zig-zag, thick, thin, diagonal, vertical, horizontal...the list went on and on!

Here are how they decided to showcase their many kinds of lines:


Monday, October 3, 2011

Environmental Education day!

Today at Five Hawks Elementary, it's environmental education day! 
Requirements: teach some of your lessons outside and incorporate learning about the environment!

Here are a few pictures from my 3rd and 4th grade projects.  We talked about lines and how you can see all different kinds in nature.


Monday, June 27, 2011

School time is here!

Welcome back!  I hope you had a great summer!
We have a lot of great things to do this school year: using paper, using pencils, using paint, using CLAY! 


Rest up, get your creative mind ready, and see you soon!
~Mrs. Gus

Wednesday, June 8, 2011

Rules Rule!


RULES Rule!
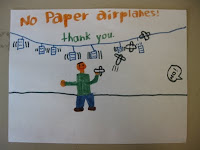
At the beginning of each school year, students hear the rules over and over and over… By the time they see me, they’ve heard it about a dozen times. I started to think of creative ways to get them to hear the rules and get in some Art those first days of school.
Each year, one of my first projects with my 3rd grade students is “Rules Posters.” I tell them that this is a very important job, and that they have been chosen to do this because they have been around long enough to know and understand the rules and their drawing skills are awesome at age 8!
I have a SMART lesson comparing and contrasting posters. We start with the US Constitution and the Art room constitution. I ask them “Which one is more interesting, and why?” Kids usually say our school’s is better because the letters are big and there’s color.
Next, we take the US constitution and compare it to an “old fashioned” black and white newspaper, asking them again “Which one is more interesting, and why?” Again, the kids will often say “The US is small and in cursive and hard to read. The newspaper has big letters-some of them fancy- and that gets my attention.”
Lastly, we take the black and white newspaper and compare it to a 1998 State Fair poster, again asking “Which one is more interesting, and why?” Students say they like the State Fair poster because it has color and pictures on it.
We talk about what makes a good poster: color, big letters and a picture.
Students use 9”x12” white drawing paper, pencils, and markers and think about the concepts of Color, Big Letters, and Pictures to design a Rules Poster to be hung in the Art room for the entire school year. They have an immediate sense of pride for their posters and point them out to others throughout the school year!

Tuesday, June 7, 2011

Art Ed websites & Blogs

There are lots of blogs and websites out there, so how do you decide which ones are valuable?

My first criteria is IMAGES. If there are no images, I will rarely stick around to see what treasures are in the text. As a visual learner, I need the pictures to show me what the end product looks like. If I can see that, I can get my brain going on what will work best for me and my students.

Next, I look at the number of lessons the creator has in their inventory. If there are just a few (like mine right now), I'll skim quickly, take what I can from it, and move on. The more lessons, the more likely I'll see what else there is to offer. It's selfish of me to say, but I also like that someone else has worked out what works and what's failed before I try it in my classroom.

Lastly, I look for people who have a situation like mine. I currently teach K-5 with 700+ students in two schools. There are some great sites that don't fit into this pre-set requirement, but if they know what my day-to-day is like, they're more likely to have worked out the kinks before I get there :)

Some favorites of mine:
http://www.deepspacesparkle.com/

http://mrspicassosartroom.blogspot.com/


http://artwithmre.blogspot.com/

http://www.artprojectsforkids.org/

http://artteacheradventures.blogspot.com/

http://artclassworks.blogspot.com/
Check my sidebar for some great blogs and websites!

Magazine drawings


What to do with all of those donated magazines?! Need a project for a substitute?
Here you go!

First, I have one student stand in the front of the group. The rest of the class closes their eyes, then opens their eyes and focuses on one thing about that classmate (shoes, hair, shirt, etc.) I tell them that while we're all looking at the same thing, we each are attracted to something different.

For the project, I have students make a ~1" square viewfinder with an index card and find a magazine. Then, they go through looking for PART of a picture that they find interesting. It could be a person, thing, part of a thing, etc. The viewfinder helps them focus on just part of an image so they don't become overwhelmed. After that, they draw!

IMPORTANT: I remind my students that their picture is going to look different than the magazine because the magazine is usually a photograph and is printed and theirs is hand-drawn. I often get "But mine is bad" or "Mine doesn't look like the picture." I tell them that if we wanted it to look exactly like the magazine image, we'd just take a photocopy.:) I tell them I want to see what they focus on and how they can get that across in their drawings!
It doesn't have to be perfect, it just has to be yours!